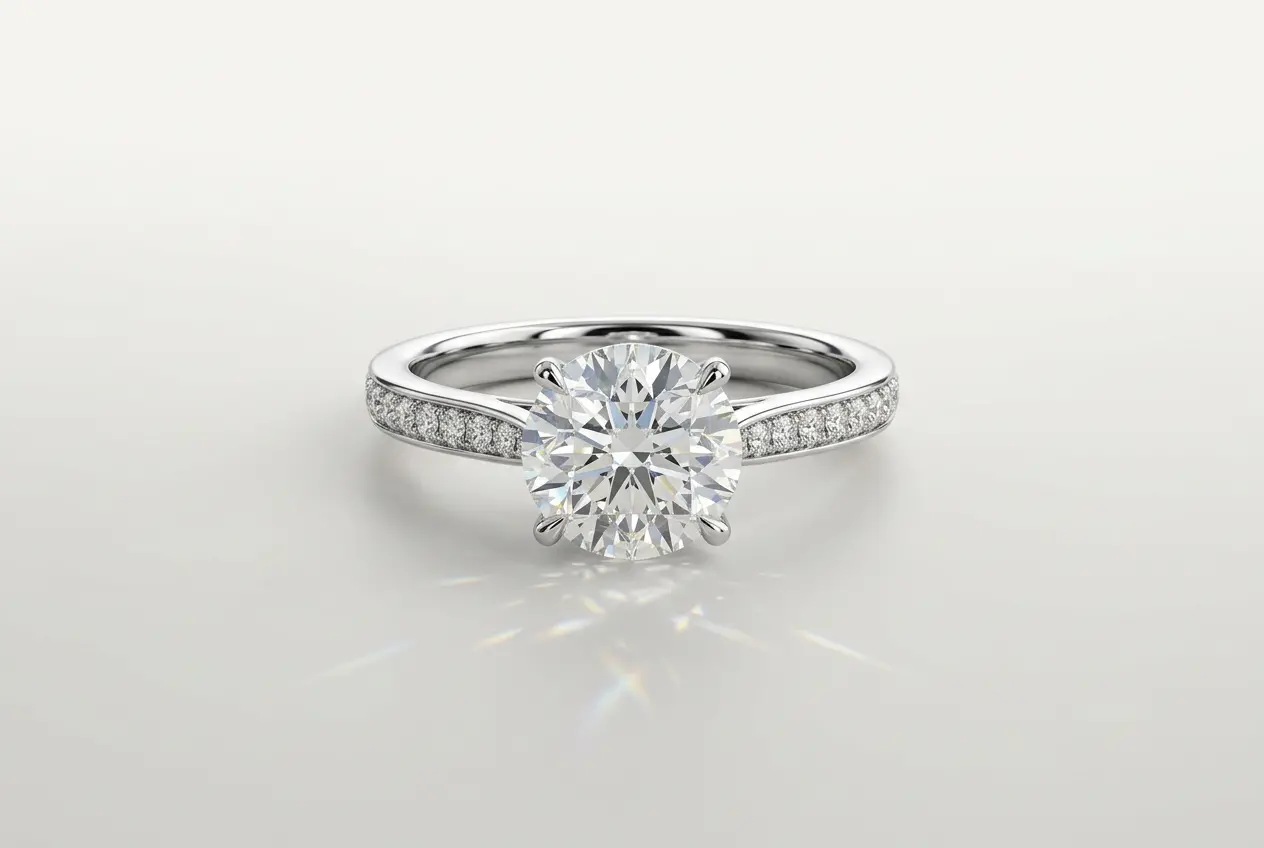
Jewellery rendering sits at the top of the difficulty scale in product visualisation. I say that having worked across furniture, cosmetics, industrial equipment, and architectural visualisation — and nothing else requires the same combination of optical physics, precision modelling, and lighting craft that a 4mm diamond demands. 3D rendering for jewellery has become the preferred production method for a growing number of brands and e-commerce sellers, not just because it cuts photography costs, but because it gives you creative and technical control that a macro lens and lightbox simply cannot match. A well-built render can show a ring at an angle that would require a custom jig to photograph. It can show a gemstone’s fire under warm directional light, then switch to cool diffused light for a second lifestyle shot — all from the same scene file. But getting there requires understanding why jewellery is hard before you can do it well.
Why 3D Rendering for Jewellery Is Technically Unforgiving
The apparent simplicity of a gold ring is exactly what makes it difficult. One material. Small object. Clean background. What could go wrong? Everything, as it turns out. Every polished surface is a mirror reflecting the entire environment. Every gemstone is an optical element with its own refraction, dispersion, and caustic behaviour. And because jewellery is small in real life, any render that doesn’t hold up under close zoom reads as fake immediately. There’s no busy background to hide in, no complex scene to distract the eye.
The three core technical challenges in jewellery rendering are consistent across projects: metal reflections that look physically accurate, gemstone caustics that behave like real optics, and micro-detail that survives cropping and large-format output. Each one demands a specific approach. Getting any one of them wrong tends to undermine the whole image, which is why jewellery is genuinely worth treating differently from general 3D product rendering services.
Getting Metal Reflections Right
Precious metals are physically based materials in the truest sense. They need accurate IOR (Index of Refraction) and spectral reflectance values — not approximations. Gold has a characteristic warm reflectance weighted toward red and yellow wavelengths that drops sharply in the blue range. That’s why gold looks gold rather than white: it selectively reflects certain parts of the spectrum. White gold sits closer to platinum but carries a marginally warmer cast. Rose gold is a specific alloy balance — the ratio of gold to copper determines whether you get a pale champagne tone or a deep copper-pink. Without a physical swatch or a properly colour-profiled photograph as reference, you’re guessing, and it will show.
The surface finish is equally critical. These four states cover most jewellery production, and each requires a different shader approach:
| Surface Finish | Optical Behaviour | Rendering Approach |
|---|---|---|
| High Polish | Near-perfect mirror reflection, minimal roughness | Roughness close to 0; HDRI quality is critical |
| Satin / Brushed | Anisotropic highlight along the brush direction | Anisotropic shader with directional texture map |
| Matte / Sandblasted | Soft, diffuse-dominant with Fresnel edge | Higher roughness value, controlled Fresnel falloff |
| Hammered / Textured | Irregular micro-faceting scatters light broadly | Displacement or normal map with varied roughness |
The HDRI environment is arguably the most important element in a jewellery lighting setup. Because a polished metal surface is a mirror, it reflects everything around it. A poorly chosen or clumsily rotated HDRI will print itself into every specular highlight on the piece. In our studio we use purpose-built jewellery HDRIs that mimic the long softbox configurations used in professional macro photography — these produce the elongated, clean catchlights that the eye instinctively associates with high-end jewellery imagery. This is one of the areas where understanding why your 3d product renders look fake 5 lighting and material mistakes to fix in 2026 pays off directly — lighting errors in jewellery are amplified by the reflective surfaces in ways that a matte product would never expose.
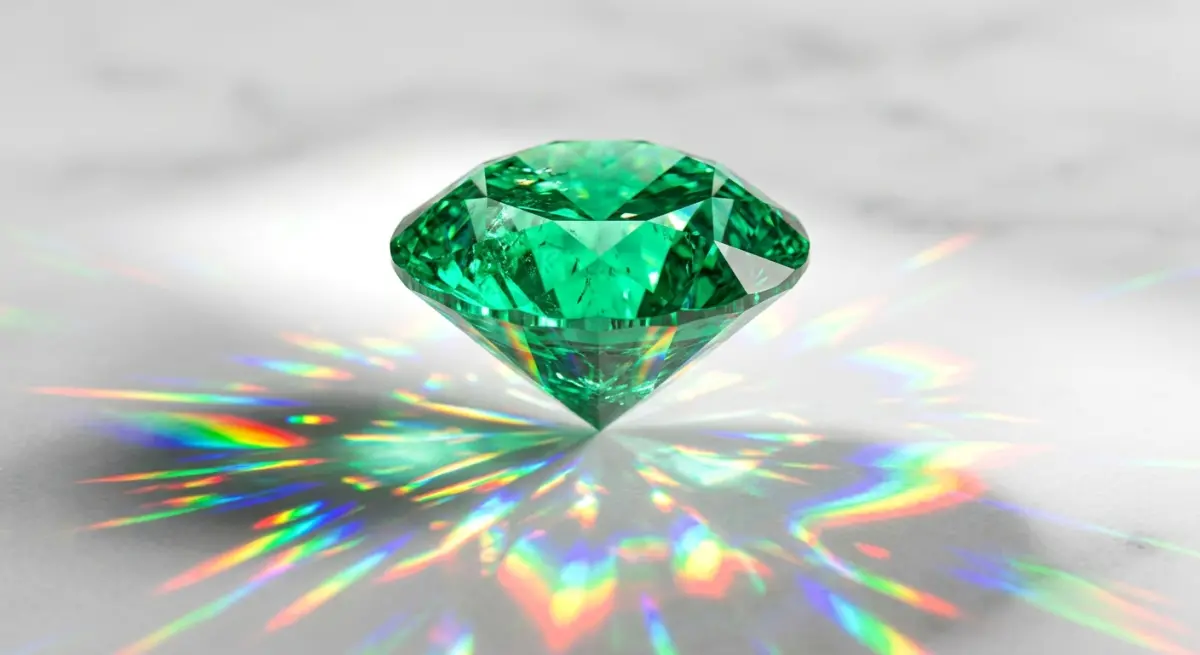
Gemstone Caustics: The Physics You Cannot Shortcut
A faceted gemstone is one of the more complex optical objects you’ll encounter in product rendering. Light enters through the crown facets, undergoes total internal reflection off the pavilion, and exits in a pattern determined by the cut geometry. The fire — those coloured flashes — comes from chromatic dispersion: different wavelengths of light refract at slightly different angles, spreading into a visible spectrum. When the stone sits in a metal setting, it also projects caustic light patterns onto the surrounding metal. These are caused by the stone acting as a lens, concentrating and redirecting light in ways that depend on the stone’s shape, IOR, and orientation relative to the light source.
There is no convincing shortcut for caustics. They require physically accurate light transport — either path tracing with spectral rendering capabilities or dedicated caustic algorithms. V-Ray handles this through caustic photon maps or the progressive light cache. Arnold supports spectral rendering natively. Blender’s Cycles can produce caustics but requires careful sampling setup to manage noise at reasonable render times. The IOR values for common gemstones vary considerably, and using wrong values changes the fire pattern entirely:
| Gemstone | IOR (approximate) | Dispersion Character |
|---|---|---|
| Diamond | 2.417 | High fire, strong spectral spread |
| Ruby / Sapphire (Corundum) | 1.762–1.778 | Lower dispersion, deep saturation |
| Emerald | 1.565–1.602 | Moderate dispersion, characteristic green body |
| Moissanite | 2.65–2.69 | Extreme fire, higher than diamond |
| Cubic Zirconia | 2.15–2.18 | High dispersion, often used as diamond simulant |
Getting the cut geometry right matters just as much as the material settings. A round brilliant diamond has a precise table percentage, crown angle, pavilion depth, and culet specification — and small deviations from these change the fire pattern noticeably. We model gemstone cuts from certified specification data rather than eyeballing the geometry. A slightly wrong crown angle isn’t something you can fix in post.
One point worth flagging: a diamond doesn’t necessarily sparkle on a static white background under flat lighting. The fire is a dynamic optical effect — it appears because light and the viewer’s angle shift relative to the stone. In a single static render, you’re capturing one frame of that motion. Lighting angle selection becomes critical. For this reason, we often recommend turntable animations or multi-angle render sets specifically for gemstone-set jewellery, so the stones can demonstrate their optical properties across positions. If you’re not familiar with the format, it’s worth looking at 360 product animation explained how spin renders actually increase ecommerce conversions — the same logic applies directly to jewellery.
Micro-Detail, Geometry Quality, and Why They Matter
In jewellery, a modelling error that would be invisible on a larger product reads immediately in a close-up render. A prong that’s 0.1mm out of position, a bezel edge that isn’t quite flush, a hallmark that’s slightly too deep — all of these show up at render resolution and in print output. We model all jewellery to actual physical dimensions, verified against product specifications before anything enters the renderer. This isn’t perfectionism for its own sake; it’s what separates renders that look like product photography from renders that look like 3D.
For surface detail specifically, the choice between displacement mapping and modelled geometry depends on the detail type and output resolution. Fine hallmarks and engraving generally need either modelled geometry or high-resolution displacement to read at close range. Brushed metal direction can be handled cleanly with a normal map. Heavier hammered or chased surfaces benefit from actual displacement that catches raking light correctly.
Polished prong tips deserve particular attention. In real macro photography, a polished metal prong tip catches a tight, bright specular point that confirms the three-dimensionality of the setting. Without it, the prongs look flat. We add a small bevel to prong edges specifically to create this catchlight — it’s a small modelling detail with a disproportionate visual impact on the final render quality.
Scaling Jewellery Renders Across a Product Catalogue
One of the most practical advantages of 3D rendering for jewellery over conventional photography is how well it scales. A brand with a range of rings available in yellow gold, white gold, and rose gold, with multiple gemstone options per design, is looking at a significant photography operation: sample production, photographer time, stylist, retouching. In a 3D pipeline, the geometry is modelled once. Material variants are swapped at shader level. The lighting rig is saved as a scene preset and applied consistently across every SKU. One well-built scene produces an entire product matrix.
Efficient scaling requires proper scene management. We run master template scenes with parametric lighting so that every product in a catalogue gets consistent treatment. Colour accuracy is maintained through calibrated colour profiles throughout the pipeline. Output is set up to deliver multiple formats in a single pass: transparent PNG for e-commerce platforms, TIFF with alpha for print, and a JPEG master for hero shots. If you’re planning a multi-SKU project, it’s worth thinking through resolution and output requirements before the first model is built — the setup decisions you make early determine how smoothly the rest of the production runs.
What Clients Get Wrong When Briefing Jewellery Renders
The most frequent problem is vague material specifications. “Rose gold” without an alloy reference or a physical swatch can mean a pale champagne tone or a deep copper-pink depending on the gold-to-copper ratio of the alloy. The difference is visible and significant. For any serious project, material callouts need to be exact — reference images should be properly photographed in neutral light, not pulled from a phone camera under yellow indoor lighting.
Background assumptions cause problems too. Clients often want pure white backgrounds because that’s the e-commerce standard. But a pure white render environment reflects white into every polished surface — crushing the contrast and making metals look dull and flat. A jewellery HDRI or a controlled gradient background preserves the depth of the reflections while still producing a clean, compositable output. You can composite against pure white in post without sacrificing the quality of what you captured in the render.
Resolution planning is a persistent oversight. A render set up for a website thumbnail and a render intended for a luxury print catalogue need fundamentally different production setups — sensor size equivalent, depth of field, sampling rates, and output resolution all change. Always brief the final use case upfront. A studio guessing at your output requirements will optimise for the wrong thing.
If you’d like to know more about giving a studio what it actually needs to produce great results, it’s worth reading our guide on how to write the perfect brief for a 3d product rendering studio with template — the principles apply to jewellery projects just as well as any other product category.
Conclusion
Jewellery rendering rewards technical precision at every stage. Get the IOR and spectral reflectance right. Model the geometry to specification. Set up your caustic simulation properly. Choose your HDRI deliberately. When these things come together, the results are genuinely difficult to distinguish from high-end macro photography — and in many respects better, because you have complete control over every variable in the image. The investment in a properly built jewellery render scene pays back many times over when you start producing material variants and catalogue updates without reshooting anything.
If you’re looking to build a jewellery rendering pipeline or need a specific project handled with the right technical approach, our team at 360render.com is ready to help. Contact us and let’s work out the right setup for your product line.
Frequently Asked Questions
Which rendering software works best for jewellery visualisation in 2025 and 2026?
V-Ray, Arnold, and KeyShot are all strong choices for jewellery rendering because they support physically accurate spectral rendering and caustic simulation. Blender’s Cycles is a capable free alternative. The software matters less than having accurate material values, proper caustic settings, and a quality HDRI environment.
How do you accurately render gemstone caustics in a 3D scene?
Caustics require physically accurate light transport — path tracing with spectral rendering enabled and correct IOR values for the specific gemstone. High sample counts are necessary to resolve the caustic pattern without excessive noise. There is no shortcut that produces convincing results; the physics need to be simulated properly.
Why does my rendered diamond not sparkle on a white background?
Fire in a diamond is a dynamic effect visible because of movement between the stone, light source, and viewer. A static render captures one moment of that motion. Lighting angle is critical — you need directional light at an angle that excites the pavilion reflections. Turntable animations or multi-angle render sets are often more effective for showing gemstone brilliance than a single hero shot.
How do you maintain micro-detail like hallmarks and engraving in large-scale catalogue renders?
Fine detail at scale requires either modelled geometry or high-resolution displacement maps — normal maps alone won’t hold up at close range or print resolution. Standardised scene templates with consistent camera settings ensure every SKU in a catalogue is treated the same way, so detail quality remains uniform across the full range.
Frequently Asked Questions
What HDRI lighting setups work best for photographically realistic jewellery 3D renders?
Jewellery renders benefit most from custom or purpose-built HDRIs that mimic controlled studio environments with softbox-style light sources, since overly complex environmental HDRIs can introduce distracting reflections in polished metal surfaces. Many professional jewellery renderers supplement HDRIs with dedicated area lights or gradient environment overrides to precisely control specular highlights and maintain brand-consistent aesthetics across product lines. Tools like HDRI Haven or custom-captured 32-bit panoramas shot in actual jewellery photography studios offer the most accurate starting point for achieving photorealistic lighting that mirrors real-world product photography standards.