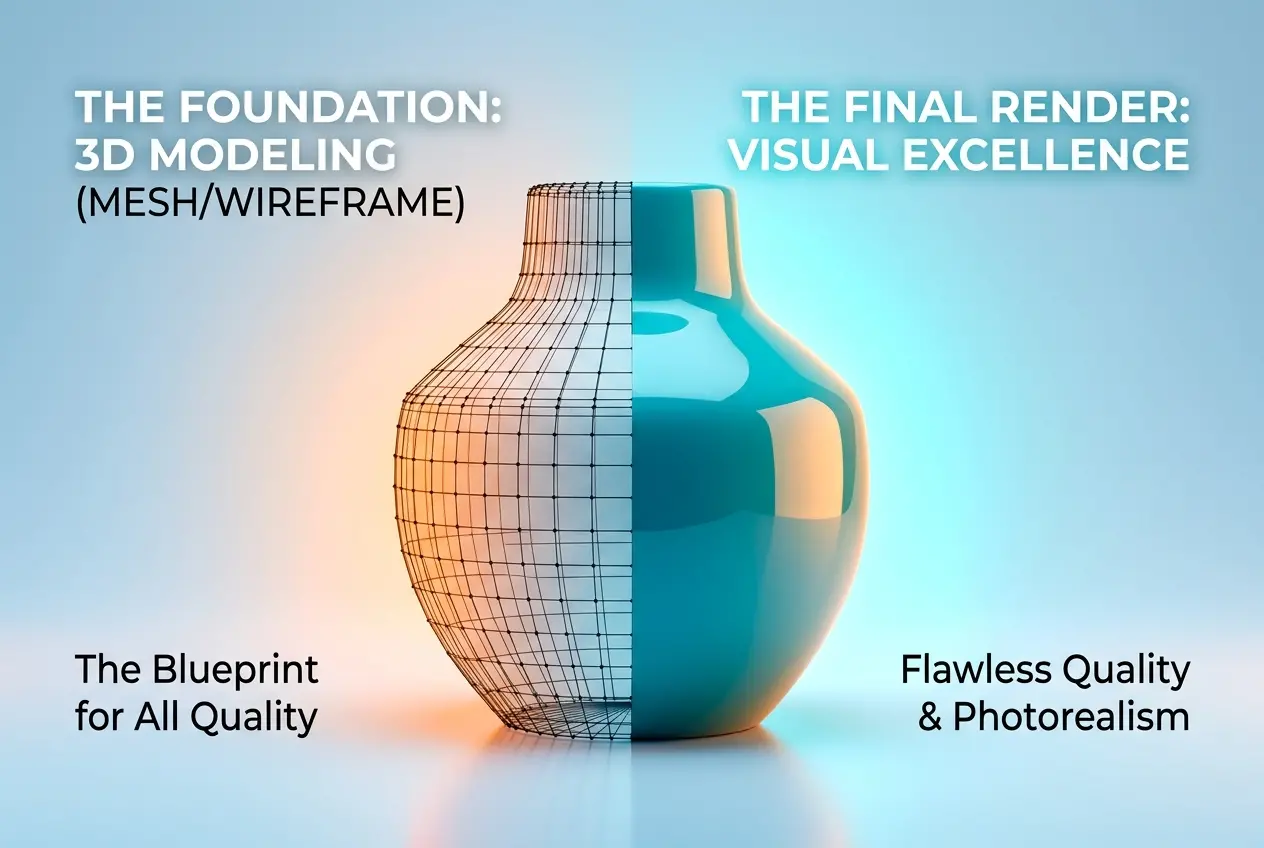
Most clients come to us thinking that the render itself — the lighting, the materials, the camera angle — is where the quality of a final image gets made or broken. It’s an understandable assumption. After all, that’s what you actually see. But when you look at 3D product modeling and rendering services: how the modeling stage determines the quality of every final image is something very few clients understand until they’ve experienced the difference firsthand. The model is the foundation. If it’s wrong, nothing downstream fixes it. Better lighting on a bad mesh just gives you a well-lit bad mesh. We’ve rebuilt models that came from other vendors halfway through a project, and the difference in the final renders was immediate and obvious — not because we changed the lighting, but because the geometry underneath was finally doing its job.
This matters especially for product rendering. Architecture has some room to breathe — surfaces are large, details are sometimes implied. But a product render lives or dies on a few centimetres of geometry. A pill bottle cap, a watch bezel, a sneaker sole, a skincare tube — these items have edges, radii, surface transitions, and material intersections that are completely unforgiving. The camera is close. The lighting is controlled and intentional. There is nowhere to hide. And so, before we talk about any render output, we need to talk about what goes into building the model correctly.
What “Good Modeling” Actually Means in a Product Context
Good modeling is not the same as fast modeling. A model can be built quickly using subdivision tricks, boolean operations, and imported geometry — and it can look fine in the viewport. Problems show up the moment you put a reflective material on it and hit render.
In our studio, we distinguish between three things when evaluating a model: topology, edge control, and scale accuracy.
Topology refers to how the polygons are organized. Clean, mostly quad-based topology flows smoothly across curved surfaces and subdivides predictably. Bad topology creates pinching, waviness, or faceting — visible artifacts on curved product surfaces that no amount of material or lighting adjustment can fix.
Edge control is about how sharp or soft transitions are between surfaces. On a real product, every edge has a physical radius — nothing is perfectly sharp. A machined aluminium body might have a 0.3mm chamfer. A plastic housing might have a 2mm fillet. These numbers matter. When we model with the correct edge tightness, specular highlights behave realistically. They form thin, clean lines on hard edges and broader highlights on softer transitions. When edge control is wrong, highlights either look like smears or hard lines in the wrong places.
Scale accuracy is straightforward but often skipped in lower-quality modeling work. If a product is built to incorrect dimensions, the relationship between surface details changes. Labels don’t sit right. Lighting references don’t match. And if the client wants to composite the product into a real photograph later, the perspective simply won’t work.
Why This Is the Core Issue in 3D Product Modeling and Rendering Services
We’ve reviewed a lot of deliverables from various vendors over the years. The most common pattern we see: the model was built to look acceptable at a distance, without anticipating the actual render conditions. When a client asks for close-up hero shots with strong rim lighting, those models fail. When they want a turntable animation, every weak surface becomes visible in motion. When they want to swap materials — say, go from matte plastic to gloss — the surface imperfections that were hidden by diffuse scattering become fully exposed.
This is exactly why, in the context of 3D product modeling and rendering services: how the modeling stage determines the quality of every final image, the modeling brief matters as much as the creative brief. Before we start building anything, we ask: What materials will this have? What camera distances are planned? Will there be close-ups? Will it be animated? The answers shape modeling decisions from the beginning.
A product going on an e-commerce page where it’s shown at 800 pixels wide might tolerate slightly looser geometry. The same product going into a full-page print ad or a high-resolution lifestyle campaign needs a model built to a much higher standard. The render resolution does not compensate for modeling quality — it actually amplifies weaknesses.
The Reference Material Problem
One of the most practical things we deal with on every project is the quality of reference provided by the client. Ideally, we get engineering CAD files. These give us exact dimensions, surface geometry, and mechanical detail. From CAD, we re-build or convert to a render-ready mesh, adding appropriate edge bevels and cleaning up geometry that doesn’t translate well to subdivision surfaces.
More often, we get a mix of materials: some photos, a rough sketch, maybe a 2D technical drawing, and a physical sample if we’re lucky. From this, we build the model by inference. The challenge here is that product photographs are rarely taken from angles that reveal every dimension clearly. A front shot might be perfect. The side might show a shape that’s ambiguous. We make decisions about those ambiguous areas based on manufacturing logic — how would this actually be injection-moulded? How would these two surfaces physically meet? These decisions, made at the modeling stage, determine what the final render looks like.
When clients provide clean, comprehensive reference — orthographic views, actual measurements, physical samples, or CAD files — the model comes out better and the renders are more accurate. This isn’t a service limitation. It’s geometry. We can only model what we can understand.
Materials and Textures Only Work on Good Geometry
Texture mapping is closely tied to modeling. The way UVs are laid out — the unwrapping of the model’s surface into a flat map — determines how every texture sits on the product. Poorly unwrapped UVs cause stretching, seams, and misaligned patterns. A wood grain that should run vertically starts twisting around a corner. A label with clean type looks warped where the UV islands are distorted.
Beyond texturing, PBR materials (physically-based rendering, the standard in modern rendering pipelines) respond to surface normals. Normal maps add fine surface detail — brushed metal texture, leather grain, fabric weave — by encoding micro-surface direction. If the base geometry’s normals are inconsistent or messy, the normal map cannot fix it. The material renders in a way that looks wrong but is hard to diagnose without understanding the underlying mesh.
In practice: when someone hands us a beautiful material library and says “apply this to the model,” the result is only as good as the model allows. We’ve worked on projects where the client was disappointed with a material result from another vendor, then found that re-modeling the product and re-applying the exact same material produced a completely different — and correct — outcome.
Common Mistakes Clients Make When Evaluating Modeling Quality

| What Clients Often Do | Why It Creates Problems |
|---|---|
| Judge the model by the grey clay preview | Clay previews hide edge and topology issues that reflective materials expose |
| Accept models built from photos alone without measurements | Scale errors affect every downstream material and lighting decision |
| Request renders before the model is fully reviewed | Fixes at the render stage require re-modeling anyway, wasting both time and cost |
| Ask for “quick models” to save budget | Quick models work for style exploration but often need rebuilding for production renders |
| Assume CAD files are render-ready | CAD geometry requires conversion, clean-up, and edge work before it can be rendered correctly |
We don’t say this to make the process seem complicated. We say it because understanding where quality decisions actually live helps clients ask better questions and evaluate vendor work more accurately.
How the Modeling Stage Shapes Every Downstream Decision
A properly modeled product is like a good brief — everything that follows is easier. Material application is faster because the surface topology is predictable. UV unwrapping is cleaner. Lighting rigs behave as expected because surface normals are consistent. Camera angles that weren’t originally planned can be added without surprises. Animation, if needed, works without the artifacts that bad geometry creates in motion.
In our experience with 3D product modeling and rendering services, the projects that complete fastest and deliver the cleanest final images are the ones where we took the time to build the model correctly at the start — regardless of how that time fit into the original schedule. The modeling stage is not a formality before the “real” work of rendering begins. It is the work. Rendering is revealing what was built.
For products specifically — especially those going into e-commerce, packaging design presentations, marketing campaigns, or product launch visuals — the model needs to carry the full weight of a photograph. It has to communicate real material, real weight, real craftsmanship. That comes from modeling choices made long before the first render button is pressed.
What to Look for When Choosing a 3D Rendering Partner
Ask any studio you’re evaluating how they handle the modeling stage. Do they ask for CAD files or technical drawings? Do they confirm dimensions before building? Do they do a model review before moving to materials and lighting? Do they show you wireframe or clay renders for approval?
These are not just workflow questions. They tell you how seriously a studio takes the foundation of the work. A team that jumps straight to pretty renders without a structured modeling review process is skipping the step that determines whether those renders can be trusted.
At 360render.com, we build every product model with the final render conditions in mind — materials, angles, resolution, and intended use all factor into how the geometry is constructed. If you’re planning a product launch, updating your e-commerce library, or preparing assets for print and digital campaigns, we’d be glad to walk you through our process. Get in touch with our team and let’s start with the model.
Frequently Asked Questions
What is 3D product modeling and how does it differ from 3D rendering?
3D product modeling is the process of building a digital three-dimensional representation of a product using specialized software, defining its shape, dimensions, and structure. Rendering is the subsequent step where lighting, materials, and camera angles are applied to the model to produce a photorealistic final image. The quality of the rendered image is directly limited by the accuracy and detail of the underlying model, making modeling the foundational stage of the entire workflow.
Why does the quality of the 3D model directly impact the final rendered product image?
The 3D model serves as the geometric backbone of every rendered image, meaning any inaccuracies in proportions, surface topology, or detail will be visible and amplified once realistic lighting and textures are applied. A low-polygon or poorly constructed model cannot be fully corrected during rendering, no matter how advanced the rendering software is. Investing in a high-quality, production-ready model ensures that every camera angle, material variation, and lighting setup produces sharp, professional results.
What are the most important factors to evaluate when choosing a 3D product modeling and rendering service?
Key factors include the studio's portfolio quality and industry experience, their ability to work from technical drawings or physical product samples, and the level of geometric detail and accuracy they achieve in their models. You should also evaluate their rendering capabilities, turnaround times, and how well they communicate revisions throughout the project. A reliable service will demonstrate a clear, structured workflow that separates the modeling approval stage from final rendering to ensure quality control at every step.
How long does the 3D product modeling and rendering process typically take?
The timeline varies depending on product complexity, but a standard product model can take anywhere from one to five business days to build, followed by an additional one to three days for rendering depending on the number of shots and scene complexity. Highly detailed products such as electronics, jewelry, or machinery with many components may require longer modeling phases to capture every precise detail. Most professional studios offer expedited timelines for an additional fee and will provide a project schedule upfront during the briefing stage.
Can 3D product rendering replace traditional product photography, and what are the cost benefits?
Yes, 3D product rendering can fully replace traditional photography for many product categories, offering greater flexibility since colors, backgrounds, and configurations can be changed without reshoots. Once a high-quality 3D model is built, generating additional views, lifestyle scenes, or marketing variations costs a fraction of organizing a new photo shoot with physical samples, props, and a photography crew. Over time, brands that invest in 3D modeling find significant cost savings, especially during product development phases when physical prototypes are not yet available.