When a brand asks us to produce e-commerce packshots for their product line, one of the first technical decisions we make is the lighting setup — and it’s a decision that shapes everything from mood to material accuracy to turnaround time. The debate around HDRI vs Studio Lighting in 3D Product Rendering: Which Setup Wins for E-Commerce Packshots is one we navigate almost every week. Neither approach is universally better. But depending on the product, the brand aesthetic, and the platform the images will live on, one will almost always be the smarter choice. This post breaks down exactly how each works, where each falls short, and how we decide between them in a professional pipeline.
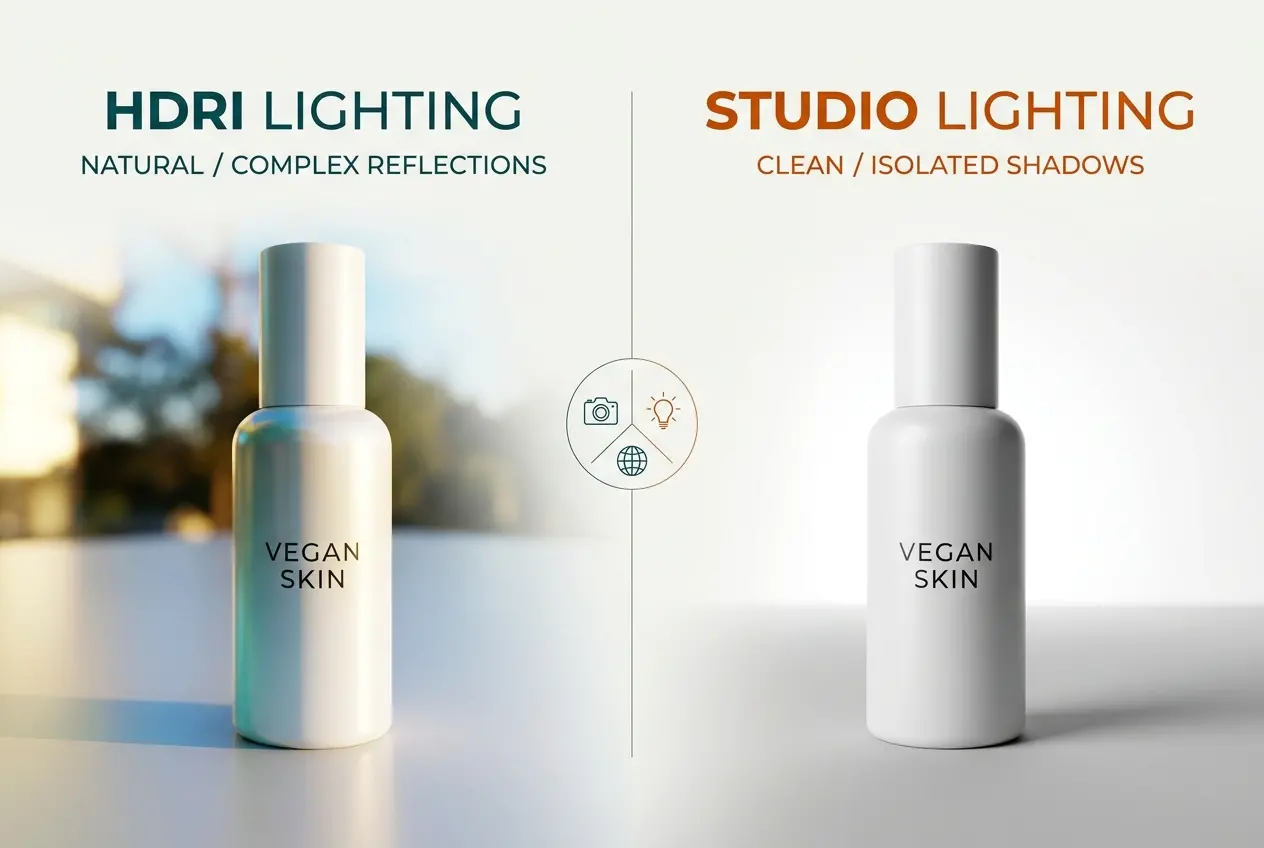
Let’s be clear about what we’re comparing. HDRI (High Dynamic Range Image) lighting uses a 360-degree photographic environment map to illuminate your 3D scene. Studio lighting, on the other hand, is a hand-built rig of virtual lights — area lights, softboxes, rim lights, fill panels — constructed inside the 3D software to replicate or improve upon a physical photography studio. Both methods produce photorealistic results. The difference is in the type of realism, the level of control, and how much time each demands from the artist.
For e-commerce, where products need to look clean, consistent, and commercially polished, these differences matter more than they do in, say, a lifestyle architectural render. A slight colour cast from the wrong HDRI can throw off a product’s perceived colour. An improperly placed studio key light can flatten a label or create unwanted shadows on a white background. Let’s go through both methods seriously.
How HDRI Lighting Works in Product Rendering
An HDRI is essentially a photograph of a real-world environment — a studio, an overcast sky, an industrial space — captured with extreme dynamic range so that both the bright light sources and the dark areas retain full detail. When you load this into a 3D renderer like V-Ray, Arnold, or Cycles, it wraps around your scene and casts light from every direction simultaneously, producing natural, multi-directional illumination with accurate reflections.
The biggest advantage is realism in reflections. For products with highly reflective surfaces — perfume bottles, metal packaging, glossy cosmetics — HDRI lighting produces the kind of environmental reflections you’d expect to see in a high-end photo shoot. The product looks like it exists in a real space. There’s a softness and complexity to the lighting that’s genuinely difficult to fake with manually placed lights, at least without spending considerable time on it.
HDRI setups are also fast to establish. Drop in a well-chosen HDRI, rotate it to a flattering angle, add a simple ground shadow catcher, and you can have a convincing starting point in minutes. For early-stage concept renders or client approval rounds, this speed is useful.
The trade-offs, though, are real. You’re at the mercy of whatever the HDRI gives you. If the environment map has a warm colour temperature or a specific directional light baked in, that’s going to influence your product render whether you want it to or not. You can partially counteract this with colour correction and additional fill lights, but once you start doing that heavily, you’re essentially blending into studio lighting territory anyway. And for e-commerce packshots — particularly white background shots or images requiring exact colour reproduction — HDRI can introduce unwanted colour casts that require corrective work downstream.
How Studio Lighting Works — and Why It Dominates Packshots
Studio lighting in 3D rendering mimics what a product photographer does in a real studio. You build a rig of light sources: typically a large area light as the key, a fill light at reduced intensity on the opposite side, possibly a backlight or rim light to define edges, and sometimes a dedicated light aimed at the background if you’re rendering against white or grey.
The control is unmatched. You can make a key light any size, temperature, and intensity you want. You can tell it to affect only certain objects in the scene, or exclude specific reflections. You can use invisible flags to block light from falling on parts of the product that shouldn’t receive it. In a physical studio, a photographer might spend hours moving equipment around and adjusting flags. In 3D, you do it in seconds.
For e-commerce packshots, this control is precisely what you need. Amazon, Shopify storefronts, and major retail platforms all have strict image requirements — typically a pure white background, consistent lighting direction across a product family, and no distracting environment reflections. Studio lighting is purpose-built for these requirements. When we’re producing a large batch of packshots for a skincare brand, for example, we’ll lock down a studio rig for the hero product, then apply that exact same rig to every variant. Every SKU in the catalogue ends up with perfectly consistent lighting, which is something you simply can’t guarantee with HDRI because even small rotational changes to the environment map produce noticeably different results.
The limitation of studio lighting is the lack of “accidental” complexity. HDRIs produce rich, realistic reflections for free — because the environment data is genuinely complex. A studio rig has to earn that complexity through careful light placement. On a highly reflective object like a metallic bottle cap or a polished glass container, a minimal studio rig can look sterile or flat. The fix is to build a more elaborate rig with additional accent lights, gradient cards, and reflection panels — which takes more time.
HDRI vs Studio Lighting in 3D Product Rendering: Which Setup Wins for E-Commerce Packshots — The Honest Comparison

| Factor | HDRI Lighting | Studio Lighting |
|---|---|---|
| Setup Speed | Fast initial setup | Slower to build, reusable once done |
| White Background Output | Requires significant post-processing | Clean and predictable |
| Colour Accuracy | Risk of environment colour casts | Highly controllable colour temperature |
| Reflective Products | Rich, natural reflections | Requires more lights for same complexity |
| Catalogue Consistency | Harder to keep consistent across SKUs | Excellent — lock rig and repeat |
| Lifestyle/Contextual Renders | Very effective | Appropriate with scene geometry |
| Platform Compliance (Amazon, etc.) | Needs extra work to comply | Directly suited to requirements |
Where Each Approach Actually Belongs in an E-Commerce Workflow
In our studio, we rarely use pure HDRI for primary packshot deliverables. We do use HDRI extensively in two specific situations. First, when we’re rendering a product in a lifestyle context — placed on a bathroom shelf, sitting on a kitchen counter, or positioned in a styled interior scene. Here, the HDRI contributes natural ambient light that integrates the product into its surroundings without looking artificially lit. Second, we sometimes use an HDRI as a base ambient fill layer combined with a custom studio rig on top — the HDRI handles the diffuse environment bounce and contributes to reflections, while the studio lights handle the directional key and rim lighting. This hybrid approach gives you the richness of HDRI with the commercial control of a studio rig.
For straightforward catalogue packshots — the white or light grey background images used on product listing pages — studio lighting is almost always our default. It’s predictable, it’s controllable, and it’s what the platforms expect. If you’re producing hundreds of SKUs, consistency across the full catalogue is non-negotiable, and a locked studio template makes that achievable.
What Clients Often Get Wrong

The most common mistake we see is clients assuming that HDRI automatically means better or more realistic renders. It doesn’t. A poorly chosen HDRI with a clashing colour temperature can make a product look worse than a basic studio setup applied with care. We’ve received briefs where the client wanted “that high-end photographic look” and assumed that meant HDRI — but what they were actually describing was the precision and intentionality of studio lighting. The two are not the same thing.
Another frequent issue is applying the wrong rendering goal to the project. If a product is matte — a cardboard box, a fabric pouch, a paper bag — the reflective richness that HDRI provides is largely irrelevant. The material isn’t going to show it. Spending time crafting an elaborate HDRI setup for a matte product is wasted effort. A clean studio rig does the job faster and with more control over shadows and surface detail.
Conversely, we’ve seen brands request flat studio lighting for a perfume bottle with a heavily reflective glass body and metallic cap. The result looks lifeless. That product category needs environmental complexity to feel real — whether that comes from HDRI, or from a studio rig with enough accent lights and reflection cards to simulate that complexity.
Material Type Should Drive Your Lighting Decision
This is the practical rule we work by: let the product’s surface characteristics guide the lighting approach.
- Glass, metal, polished surfaces: HDRI or hybrid. Reflective materials need environmental complexity to look real.
- Matte packaging, fabric, paper: Studio lighting. Clean, directional, and shadow-controlled.
- Mixed materials (label on glass, matte on chrome): Hybrid — studio key with HDRI fill and carefully managed reflections.
- Lifestyle renders with environment: HDRI as primary, studio accents as needed.
- White background catalogue shots: Studio lighting, almost without exception.
This framework isn’t rigid — every product has its own behaviour — but it gives us a starting point that avoids the most common errors.
Render Engine Matters Too
It’s worth noting that how HDRI and studio lighting perform depends partly on the render engine. In path-traced engines like V-Ray, Arnold, or Redshift, HDRI lighting integrates beautifully because the renderer accurately simulates how light bounces off surfaces in all directions. In older rasterisation-based workflows, HDRI can look flat or unconvincing because the engine doesn’t handle indirect light the same way. If you’re working with a professional product rendering studio, they’ll be using a production-grade path tracer, and the HDRI vs studio decision becomes a purely creative and commercial one — not a technical limitation.
Understanding the rendering process itself helps clients give better briefs and make more informed decisions about their deliverables. If you want to go deeper into how the overall 3D rendering process works from modelling through to final output, that context helps you understand why lighting decisions happen at the stage they do.
Our Recommendation for E-Commerce Packshots
If you’re commissioning packshots for a product catalogue — especially for platforms with strict image requirements — start with studio lighting. It gives you clean backgrounds, consistent results across your SKU range, and direct control over colour temperature and shadow character. If your product has highly reflective surfaces, ask your rendering studio about a hybrid approach: HDRI for ambient fill and reflections, studio lights for the directional key and edge definition.
Don’t let anyone tell you that one method is always superior. The best packshot is the one that makes the product look exactly how the brand intends — and that means choosing the right tool for the specific product, not the most fashionable technique.
If you’re not sure which approach your product needs, we’re happy to look at the brief and advise before any work begins. Reach out to us directly through our 3D rendering enquiry page — we’ll give you an honest assessment of what will work best for your product and your platform requirements.
Frequently Asked Questions
What is the difference between HDRI and studio lighting in 3D product rendering for e-commerce?
HDRI (High Dynamic Range Image) lighting uses a 360-degree photographic environment map to cast realistic, complex light and reflections onto a 3D product, mimicking real-world conditions with minimal setup. Studio lighting, by contrast, uses manually placed virtual lights such as softboxes, area lights, and rim lights to give the artist full control over shadows, highlights, and mood. For e-commerce packshots, HDRI excels at photorealism while studio lighting offers precision and consistency across an entire product catalog.
Which lighting method produces more realistic 3D product packshots for online stores?
HDRI lighting generally produces more photorealistic results because it captures genuine environmental light data, including subtle color variations and complex reflections that are difficult to replicate manually. This makes it particularly effective for products with highly reflective or transparent surfaces, such as glass bottles, metallic packaging, or jewelry. However, studio lighting with well-calibrated setups can match or exceed HDRI realism when the artist has deep expertise and uses high-quality render engines like Arnold or V-Ray.
Is HDRI or studio lighting faster to set up for batch e-commerce product rendering?
HDRI lighting is typically faster to set up initially because a single environment map can instantly provide balanced, realistic illumination without placing and tweaking individual lights. However, for batch rendering large product catalogs where consistent branding and controlled shadow placement are required, a pre-built studio lighting rig can be reused across hundreds of renders with minimal adjustment. The fastest overall workflow often combines both methods, using an HDRI as a base while adding one or two studio lights for targeted control.
Does HDRI lighting work well for white-background e-commerce product renders?
HDRI lighting alone is not ideal for achieving clean white-background packshots because environment maps introduce colored reflections and ambient tones that can make background isolation more complex in post-production. Studio lighting setups with a controlled three-point or key-fill-rim configuration are better suited for producing the clean, isolated white backgrounds that major e-commerce platforms like Amazon require. Many 3D artists use HDRI for product illumination while rendering the background separately or using a neutral gray HDRI specifically designed for white-background workflows.
Which is more cost-effective for small e-commerce businesses: HDRI or studio lighting in 3D rendering?
For small e-commerce businesses outsourcing 3D rendering, HDRI-based workflows often translate to lower costs because they require less manual lighting time, reducing billable hours for simpler product categories. High-quality HDRI maps are also widely available for free or at low cost through libraries like Poly Haven, making them accessible without significant investment. Studio lighting setups may carry higher initial setup costs in terms of artist time but pay off over large-scale catalog projects where a single reusable rig amortizes the effort across hundreds of consistent product renders.