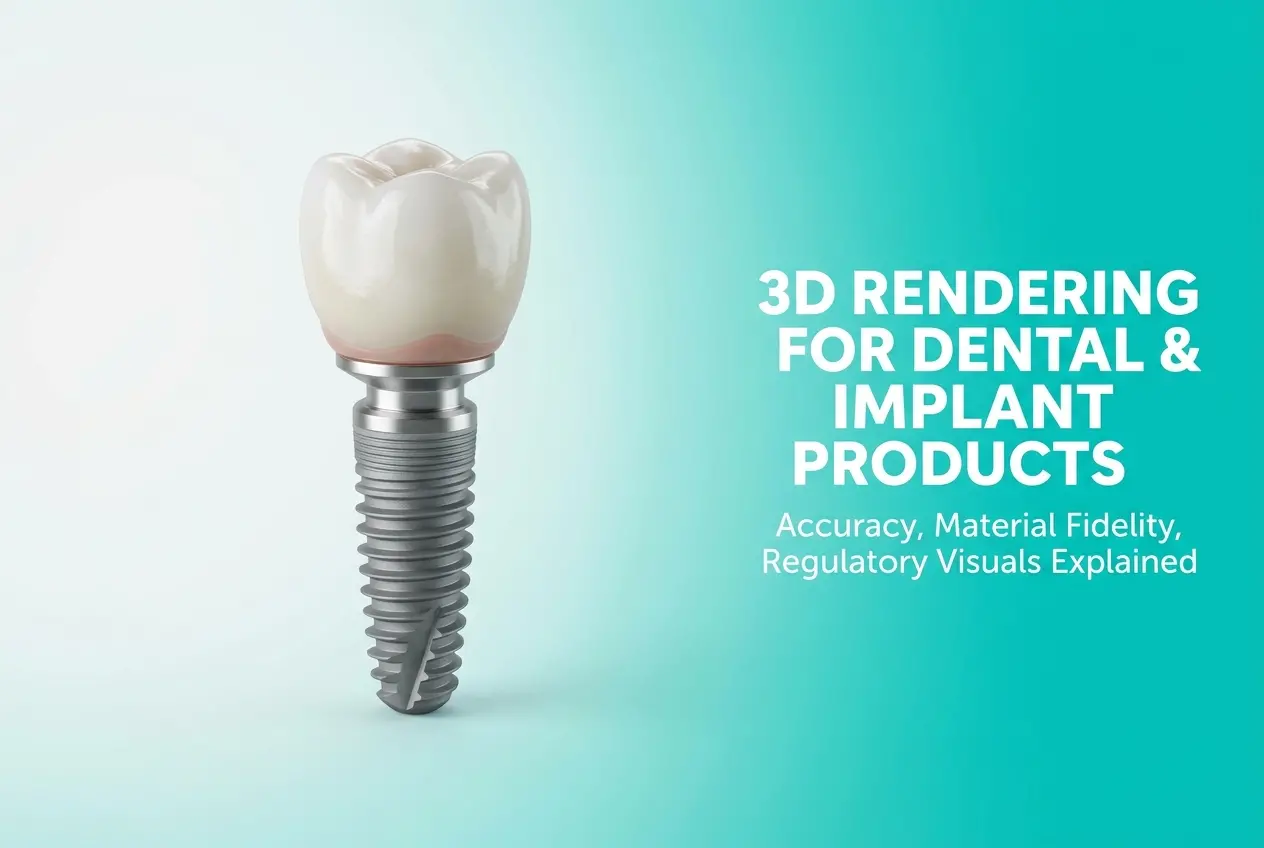
When clients approach us for 3D Rendering for Dental and Implant Products: Accuracy, Material Fidelity and Regulatory Visuals Explained, the first thing we tell them is this: dental rendering is not like rendering a sofa or a phone case. The tolerance for error is almost zero. A zirconia crown that looks slightly warm-toned on a render but ships with a cooler clinical white creates real trust problems. A dental implant component rendered with inaccurate thread pitch can mislead surgeons and distributors. This is a product category where 3D visuals carry weight — clinical, commercial, and sometimes regulatory weight. And that changes how we approach every single asset.
We work with implant manufacturers, dental device distributors, orthodontic companies, and OEM suppliers who need visuals that hold up in three very different contexts: sales and marketing materials, product catalogues for distributors, and documentation submitted for regulatory or compliance review. Each context has different requirements, and a single render rarely serves all three without deliberate planning. Understanding those layers upfront is what separates a good dental rendering project from one that produces unusable assets.
The good news is that when done correctly, 3D rendering for dental products produces visuals that physical photography simply cannot. You cannot easily photograph a 3mm titanium implant showing its precise thread geometry, surface texture, and internal hex driver simultaneously without specialist macro equipment and controlled studio conditions. In 3D, that shot is repeatable, adjustable, and consistent across an entire product line.
Why Accuracy Is Non-Negotiable in Dental and Implant Rendering
Dental products operate within micron-level tolerances. A bone-level implant has specific collar heights, thread profiles, and connection geometries that define its clinical function. When a surgeon or restorative dentist reviews product literature — whether in a printed catalogue or a digital brochure — they are reading the visual the same way they would read a technical drawing. They are making clinical judgments based on what they see.
This is why we never start a dental rendering project from a rough mesh or a generic implant template. Every project begins with verified CAD data. STEP or IGES files from the manufacturer’s engineering team are the baseline. We model-check these against technical drawings and physical reference samples when available. Any discrepancy between the CAD and the physical part needs to be flagged before rendering begins — not after a hundred frames are produced.
Thread geometry deserves special attention. Tapered implants, straight-wall implants, bone condensing designs — they each have distinct thread profiles that differentiate them clinically. Self-tapping cutting flutes, micro-threads at the collar, thread pitch spacing — these features must be rendered at accurate proportions relative to each other. We use reference photography at macro scale as a validation check. If the rendered thread profile doesn’t match the reference photograph from the same camera angle, something in the mesh is wrong.
Internal connection geometry is another area clients often underestimate. Conical connections, hex connections, tri-lobe systems — these need to be visible and geometrically correct in exploded views or cross-section renders. When distributors use these images to train sales teams or when regulatory submissions include product identification visuals, an inaccurate connection diagram creates real liability.
Material Fidelity: Getting Titanium, Zirconia and PEEK Right

Dental implants and prosthetic components use a narrow but demanding palette of materials. Titanium grade 4 or grade 5 (Ti-6Al-4V), zirconia, PEEK, cobalt-chrome, PMMA, and various ceramic layering materials each have distinct visual properties. Getting these wrong in a render makes the product look cheaper, less precise, or clinically unconvincing. Getting them right builds immediate credibility with a clinical audience.
Titanium is often the trickiest material in dental rendering — not because it’s complex, but because manufacturers get it wrong by making it look too polished or too grey. Surgical-grade titanium has a specific surface finish depending on its function. The implant body might have a roughened, sandblasted or acid-etched surface texture (SLA surface) that scatters light in a specific way. The coronal portion might be machined to a different finish. The abutment or prosthetic connection might be polished. Each zone needs a distinct material assignment, not a single titanium shader applied to the whole part.
For SLA surfaces specifically, we build custom displacement maps that replicate the micro-texture at rendering scale. This is not something you can achieve with a simple roughness value in a PBR shader. The subsurface scatter of light across those micro-peaks and micro-valleys is what gives the implant body its characteristic matte-but-structured appearance. It’s subtle, but clinicians notice it immediately.
Zirconia crowns and abutments need careful translucency work. Monolithic zirconia is less translucent than layered zirconia, and both differ from traditional PFM restorations. Getting the subsurface scattering depth right without making the crown look plastic is a consistent challenge. We calibrate translucency values against physical shade guides (VITA or similar) to ensure the rendering matches what the dental technician and dentist will expect to see chairside.
PEEK is increasingly used in provisional and permanent restorations. It has a slightly waxy, off-white appearance with very low translucency. It’s easy to render incorrectly as generic white plastic. The material identity matters here because PEEK’s value proposition is partly visual — it looks tooth-like without the ceramic brittleness — and renders need to communicate that honestly.
| Material | Key Visual Property | Common Rendering Mistake |
|---|---|---|
| Grade 4/5 Titanium (implant body) | Roughened SLA micro-texture, matte with structure | Applied as single polished metal shader |
| Machined Titanium (abutment) | Lathe-finish machined lines, moderate reflectivity | Made too bright or too mirror-like |
| Monolithic Zirconia | Low translucency, ceramic opacity | Over-translucent, looks glassy |
| Layered Zirconia | Gradient translucency, enamel-like scatter | Uniform material, no gradient treatment |
| PEEK | Waxy off-white, minimal translucency | Rendered as generic white plastic |
| Cobalt-Chrome (framework) | Bright, slightly warm silver, high reflectivity | Confused with stainless steel shader |
Regulatory Visuals: What Clinical Documentation Actually Requires

This is the area most rendering studios don’t talk about, because most studios don’t work regularly with medical device manufacturers who submit documentation to regulatory bodies. For dental implant systems, product identification images submitted as part of technical files — for CE marking under MDR, FDA 510(k) submissions, or similar — need to follow specific conventions.
Regulatory visuals are not marketing renders. They are identification assets. They need to clearly show the product in orthographic or near-orthographic views, with no artistic lighting that creates ambiguity about shape. Dimensions, tolerances, and part numbers are typically overlaid by the regulatory documentation team, but the base render needs to provide a clean, unambiguous visual of the component from standard views: front, side, top, cross-section where required.
We typically render regulatory documentation assets at much higher resolution than marketing renders, with flat studio lighting that eliminates cast shadows that might obscure features. The background is always neutral — white or light grey. There is no environmental context, no lifestyle element, no dramatic angle. The goal is clinical clarity, not aesthetic appeal.
Cross-section renders for implant systems are particularly important in regulatory and surgeon education contexts. Showing the internal connection geometry, the screw channel, the thread engagement in bone — these views require precise cutaway geometry in the 3D model. We create dedicated cut-plane meshes rather than relying on boolean cuts that can introduce mesh artifacts at section edges.
Contextual Renders: Showing Implants in Anatomical Settings
Beyond documentation, dental implant marketing heavily relies on contextual renders — implants placed in bone models, crowns seated on abutments within idealized dental arch views, full smile restorations showing the prosthetic outcome. These require a different skill set entirely: anatomically plausible bone and gingival tissue models, realistic tooth geometry, and lighting that works in a clinical-but-approachable aesthetic.
Bone models for these renders need to show appropriate cortical and trabecular structure. Gingival tissue around healed implants has specific morphology — the papilla, the emergence profile — that trained clinicians will evaluate. We source reference from dental anatomy texts and clinical photography to ensure the surrounding anatomy looks credible, not like a generic body part mesh pulled from a stock library.
These contextual renders serve educational and conversion purposes simultaneously. A surgeon reviewing a new implant system wants to see how it sits in bone at the macro and micro level. A patient-facing brochure wants to show a confident smile with natural-looking restorations. The same 3D scene can be lit and framed two completely different ways to serve both audiences — which is one of the real efficiencies of building the scene correctly the first time. If you want to see the range of contexts professional rendering covers, our work in product rendering services gives a good overview of how we approach technically demanding product categories.
What Clients Get Wrong (And How to Avoid It)
The most common mistake we see from dental manufacturers coming to us for the first time is providing marketing briefs without CAD files. They share competitor images, mood boards, or even photography of their product, and expect us to reconstruct the geometry from that. For most consumer products, creative reconstruction is workable. For dental implants, it’s not — the geometry needs to come from engineering data, full stop.
The second common issue is treating all renders in a project as the same deliverable. A company will brief us for a catalogue update and describe everything as “product photos.” But the cross-section diagram for their surgical guide, the lifestyle render for their website hero banner, and the individual component identification image for their regulatory file are three completely different types of assets with different requirements. Conflating them creates confusion about what we’re actually delivering and why.
Scale is another recurring challenge. Dental components are small. A standard implant is between 3.3mm and 5mm in diameter, 8–16mm in length. In a render, it needs to appear at a size where its clinical features are legible. This means thinking carefully about camera focal length, scene scale, and whether the render is showing the part in isolation or in anatomical context. Showing a 3.5mm implant at natural scale in a full-arch context makes it too small to read. Showing it isolated at 10x scale to display thread geometry requires a completely different scene setup.
Finally, clients often underestimate turnaround time for dental rendering compared to other product categories. The model preparation alone — checking CAD, cleaning mesh, setting up material zones, building ancillary anatomy — takes longer than rendering a consumer electronics component of similar physical size. Quality takes the time it takes.
Conclusion: Precision Visuals That Work Across Every Context
3D rendering for dental and implant products, when done with the right technical foundation, produces assets that serve clinical education, sales enablement, regulatory documentation, and patient communication simultaneously. The investment in accuracy upfront — correct CAD, correct material fidelity, correct anatomical context — pays back across every use case the manufacturer needs to address.
At 360render.com, we approach dental and implant rendering the same way an engineer approaches a manufacturing drawing: every feature is there for a reason, every material assignment is deliberate, and nothing ships until the visual matches the physical reality of the product. If you’re working on a dental product line that needs renders built to clinical and commercial standards, get in touch with our team and let’s discuss what your project actually needs.
Frequently Asked Questions
How accurate are 3D renderings for dental implant products compared to actual clinical photography?
High-quality 3D renderings created from precise CAD data can achieve near-photographic accuracy, replicating surface textures, thread geometries, and material finishes within micron-level tolerances. Unlike clinical photography, renderings offer complete control over lighting, angle, and environment, eliminating variables that can distort perception of size or color. Many dental manufacturers now prefer renderings for product launches because they can visually match or exceed the consistency of studio photography while being produced before physical samples are available.
Can 3D rendered images of dental implants and prosthetics be used in FDA or CE regulatory submissions?
3D renderings can support regulatory submissions as supplementary visual documentation, particularly for illustrating product design intent, device geometry, and intended use scenarios, but they typically cannot replace validated technical drawings or certified photographs for critical dimensional evidence. Regulatory bodies like the FDA and notified bodies under EU MDR expect submissions to include verified engineering drawings and, where applicable, actual device photographs for predicate comparisons. Always confirm with your regulatory affairs team which visual formats are accepted as primary versus supporting documentation for your specific submission type.
What materials and surface finishes can 3D rendering software accurately simulate for titanium dental implants?
Modern physically-based rendering (PBR) engines can accurately simulate titanium's characteristic matte-silver appearance, anodized color variants, sandblasted and acid-etched (SLA) surface textures, and machined micro-grooves that are critical to osseointegration perception. Software tools like KeyShot, Cinema 4D, and Blender with advanced shaders allow artists to replicate roughness values, subsurface light scattering, and reflection properties that match spectrophotometric data from real implant surfaces. The key to fidelity lies in combining accurate CAD geometry with properly calibrated material libraries referenced against physical material samples.
How is 3D rendering used to explain complex dental implant procedures for patient education and marketing?
3D rendering enables the creation of anatomically accurate cross-section visuals, exploded assembly views, and animated procedure walkthroughs that show exactly how an implant integrates with bone, how abutments connect, and how the final crown is seated—content that is nearly impossible to capture clearly with conventional photography. These visuals are widely used in chairside education tools, clinic websites, and sales presentations to help patients and clinicians understand product benefits without requiring cadaver models or invasive demonstration. When paired with medically reviewed anatomical data, rendered educational content also builds trust and supports informed consent processes.
What is the typical cost and timeline for producing regulatory-grade 3D renderings for a dental implant product line?
Regulatory-grade 3D renderings for a dental implant product line typically range from $500 to $5,000 per SKU depending on geometry complexity, number of required views, and the level of material and surface detail needed, with project timelines ranging from one to four weeks per product. Costs increase when renderings must accompany IFU documents, multi-angle exploded views, or animated sequences that require frame-by-frame accuracy and QA review cycles. Investing in a reusable master 3D asset library upfront significantly reduces per-asset costs for future product iterations, label updates, or new regulatory market submissions.