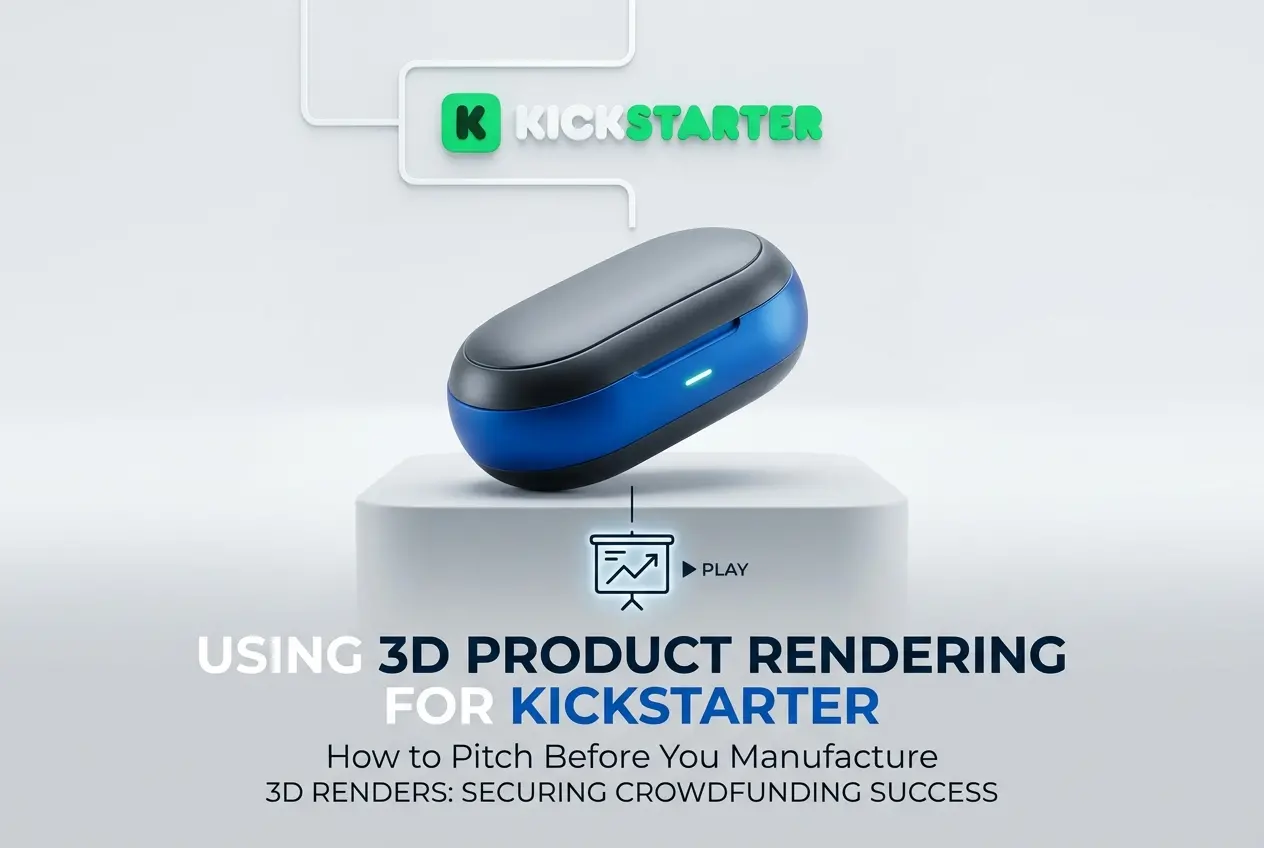
Launching a product on Kickstarter before it physically exists is not a new concept, but pulling it off convincingly is harder than most founders expect. Using 3D product rendering services for Kickstarter campaigns — how to pitch before you manufacture — is something we get asked about constantly, and for good reason. Backers need to believe your product is real, well-designed, and worth their money, even when you haven’t produced a single unit yet. The gap between “I have an idea” and “here is something that looks production-ready” is exactly where high-quality 3D rendering lives.
The honest truth is that most product ideas don’t survive the first meeting with a manufacturer, let alone make it to a campaign page. But with 3D rendering, you can validate the design, build backer confidence, and raise funds — all before spending a rupee or dollar on tooling or injection molds. We’ve seen clients come to us with nothing more than a napkin sketch and a conviction that their product will sell. What they leave with is a full visual identity for their campaign that would be indistinguishable from a finished product in a photography studio.
This post breaks down exactly how that process works — what renders you need, when to use them, and the mistakes that kill campaigns before they even launch.
Why Backers Respond to Renders the Same Way They Respond to Photographs
This surprises a lot of first-time campaign creators. They assume backers will be skeptical of digital imagery, but in practice, the distinction between a photograph and a photorealistic 3D render is nearly invisible when the render is done properly. The human eye is responding to light, material texture, and proportion — not the method used to create the image.
In our studio, we’ve worked on consumer electronics, furniture, outdoor gear, and kitchen products — and in every case, a well-lit render with accurate materials, realistic shadows, and a considered composition reads as a photograph. The key word there is “well-lit.” Bad renders look bad the same way bad photography looks bad: flat lighting, wrong material response, no sense of depth. The technical process is different but the visual quality standards are identical.
What actually gives backers confidence isn’t the image itself — it’s the detail that proves you’ve thought the product through. Proper proportions, visible joinery or assembly details, realistic surface finish, a coherent color palette. These things communicate that a real engineer and designer have been involved. A fuzzy CAD screenshot does the opposite.
Using 3D Product Rendering Services for Kickstarter Campaigns: What You Actually Need
Most campaigns don’t need fifty renders. They need the right renders. After working on a number of pre-manufacturing product campaigns, here’s what tends to do the work:
Hero Shot
This is the single image that appears at the top of your campaign and in all advertising. It should show the product in its most flattering configuration, in context, with lighting that feels aspirational but believable. One strong hero image will do more work than ten mediocre ones. This is where budget should be concentrated.
In-Context Lifestyle Renders
Show the product being used, in a realistic environment. A compact water purifier sitting on a kitchen counter. A folding backpack hanging off a chair in a modern apartment. These renders answer the unspoken backer question: “Where would this fit in my life?” You can build these environments entirely in 3D, or composite your product render onto a real photograph — both approaches work depending on the budget and timeline.
Detail and Feature Callouts
Backers on Kickstarter are more technically curious than regular e-commerce shoppers. They want to see the stitching, the button mechanism, the port placement, the hinge. A series of tight close-up renders with callout labels serves this need without requiring physical prototypes. This is one area where 3D genuinely outperforms photography — you can render angles and cross-sections that would be physically impossible to photograph on a real object.
Exploded View or Assembly Diagram
Optional but powerful for anything with mechanical complexity. An exploded 3D render shows each component floating apart from the assembly. It communicates engineering seriousness and helps backers understand what they’re buying. We’ve seen these renders turn skeptical comments into confident pledges on tech-heavy campaigns.
Color and Variant Options
If your campaign offers multiple colorways or configurations, renders are the only practical way to show them all before manufacturing. Swapping materials in a 3D scene takes hours; re-shooting a physical product in different finishes takes days and costs significantly more. This is one of the clearest practical advantages of rendering for pre-manufacture campaigns.
What File or Model Format Do You Actually Need to Start?
This is the question that stops a lot of founders. You don’t need a finished manufacturing-ready CAD file to begin renders. What you do need is a geometry source — something that describes the shape of your product accurately enough to build from.
Usable starting points include: rough SolidWorks or Fusion 360 files, STEP or IGES files from a design engineer, detailed industrial design sketches with defined dimensions, or even a well-built Rhino or Blender file. What doesn’t work well is a concept sketch with no dimensions or a reference photograph alone. We can interpret and fill gaps, but the core geometry needs to come from the creator. If your product has no design file at all yet, that’s actually a separate conversation — the 3D modeling phase needs to happen first, then rendering follows.
For clients launching on Kickstarter specifically, we often recommend starting with the 3D product rendering services workflow rather than architectural-style rendering, because product renders require a very different approach to material physics, lighting rigs, and post-production.
The Campaign Page Visual Stack: How to Organize Your Renders
One thing creators get wrong is treating every render as equal. Your campaign page is a narrative — it needs to move a visitor from curiosity to trust to conviction. The visual stack should do the same thing.
| Section of Campaign Page | Render Type | Purpose |
|---|---|---|
| Header / Thumbnail | Hero Shot | First impression, stops the scroll |
| Introduction Section | Lifestyle / In-Context | Emotional connection, shows use case |
| Features Section | Detail Callouts | Builds trust through technical specificity |
| How It Works | Exploded or Cross-Section | Demonstrates engineering credibility |
| Variants / Options | Color / Config Renders | Expands pledge tiers, drives upsells |
| Social Media and Ads | Cropped Hero or Animated Render | Campaign reach and pre-launch buzz |
The table above reflects how we typically advise clients to think about their render deliverables — not as a batch of images, but as a visual system with specific jobs to do at each stage of the backer’s decision journey.
Animations and Turntables: When Are They Worth It?
Product animation — whether a simple 360-degree turntable or a full exploded-to-assembled sequence — adds a different dimension to a campaign. For Kickstarter specifically, video is almost mandatory. The question is whether that video is product animation, live-action footage, or a combination.
In our experience, animated renders work best as short, looping inserts within a longer live-action campaign video. A ten-second turntable showing your product from every angle, played inside a human-narrated video, gives backers the spatial understanding that even good static renders can’t fully provide. Full animation is more expensive than still renders and takes more production time — so it’s worth thinking carefully about whether your campaign budget and timeline can accommodate it, or whether a strong set of static renders with a live-action intro video is the smarter choice.
What Clients Often Get Wrong Before Coming to Us
A few patterns come up repeatedly:
Starting too late. A campaign launch date is fixed, and renders take time — especially if the product geometry needs cleanup or the design goes through revisions during the render process. Reaching out two weeks before launch is too late for a full render package. Six to eight weeks is realistic for most product types, more if animation is involved.
Providing incomplete design files. Renders can only show what the design specifies. If the button placement is undefined, or the material finish hasn’t been decided, those decisions get made during the render brief — and changes mid-project cost time and money. The more resolved your design file is before rendering begins, the faster and cheaper the project runs.
Trying to show everything in one image. Every single feature, every variant, every color option, all in one hero shot. It never works. Strong renders are focused — one clear subject, one clear light source, one clear story. If you have twelve features, that’s twelve opportunities for individual renders or a structured callout composite. Not one image drowning in labels.
Ignoring the thumbnail. On Kickstarter’s browse pages, your thumbnail is competing with dozens of other campaigns at thumbnail size. We always recommend reviewing your hero render at small sizes before approving it. If it reads clearly at 200 pixels wide, it works. If it becomes muddy or confusing, it needs to be reconsidered regardless of how beautiful it looks at full size.
What It Actually Costs and How to Think About Budget
This varies enormously depending on complexity, number of renders, and animation requirements. A single-product consumer goods render package — hero shot plus four to six supporting renders — sits in a range that most serious Kickstarter campaigns can accommodate within their pre-launch marketing budget. Where costs climb quickly is animation, highly complex mechanical products with many sub-components, or frequent mid-project design revisions.
The practical way to think about it: if you’re planning to raise a meaningful amount through your campaign, the visual assets are the single highest-leverage investment in your pre-launch budget. A weak visual presentation is the most common reason a well-designed product fails to fund. The rendering cost is small compared to what a failed launch costs you in lost time and manufacturing deposits already paid.
Ready to Build Your Campaign Visuals Before You Manufacture?
If you’re planning a crowdfunding campaign and need product renders that will hold up to backer scrutiny, the conversation starts with your design file and your campaign date. Our team at 360render.com has worked with product creators at exactly this stage — before manufacturing, before physical prototypes, with everything riding on the campaign visuals. We know what makes these images work, and we know the timelines that Kickstarter campaigns actually run on.
Get in touch through our project inquiry page and tell us what you’re building. Bring your design files, your launch date, and a clear sense of what you want backers to feel when they land on your page. We’ll take it from there.
Frequently Asked Questions
Can I use 3D product renderings instead of real photos for my Kickstarter campaign?
Yes, Kickstarter allows 3D product renderings as long as you clearly disclose that the images are simulated or pre-production visualizations. Many successful campaigns use photorealistic 3D renders to showcase their product before manufacturing, helping backers understand the final design. Just ensure your campaign page is transparent about the product being in development to maintain backer trust and comply with Kickstarter's guidelines.
How much does it cost to get 3D product rendering services for a Kickstarter campaign?
The cost of 3D product rendering services for a Kickstarter campaign typically ranges from $500 to $5,000 or more depending on the complexity of the product, number of views, and level of photorealism required. Simple consumer products with a few standard angles may fall on the lower end, while complex mechanical or electronic devices with lifestyle scenes can cost significantly more. Investing in high-quality renders often pays off, as professional visuals directly influence backer confidence and conversion rates.
What types of 3D renders do I need for a successful Kickstarter product launch?
For a compelling Kickstarter campaign, you should ideally have a combination of hero product shots, 360-degree or multi-angle views, exploded assembly renders, and lifestyle or in-context scene renderings. Animated 3D product videos or turntable animations are also highly effective at increasing engagement and backer pledges. Having a variety of render types helps tell your product story visually and answers common backer questions about features, materials, and scale without needing physical prototypes.
How do I find a reliable 3D product rendering studio for my Kickstarter project?
You can find reliable 3D product rendering studios by browsing platforms like Behance, Dribbble, or 99designs, or by searching for specialized product visualization agencies with Kickstarter campaign portfolios. Look for studios that have experience rendering products in your category, offer revision rounds, and can provide references or case studies from previous crowdfunding projects. Always review sample renders carefully for photorealism, lighting quality, and attention to material detail before committing to a contract.
Will backers trust a Kickstarter campaign that only shows 3D renders and no physical prototype photos?
Backers can absolutely trust a Kickstarter campaign that relies on 3D renders, provided the campaign is transparent, well-branded, and supported by a credible founding team with clear manufacturing plans. Including behind-the-scenes content such as CAD files, engineering specs, or development updates alongside the renders helps build credibility and shows that real progress is being made. Many top-funded Kickstarter campaigns have launched with renders only, proving that professional visuals combined with honest communication can effectively convert skeptical visitors into enthusiastic backers.