If you manufacture heavy machinery, industrial equipment, HVAC systems, power infrastructure, or any kind of engineered product, you already know the problem. Your product looks incredible in real life — precision-engineered, built to last, genuinely impressive — but photographs either don’t exist yet because the unit is still in production, or they exist and somehow manage to make a ₹2 crore machine look like a blurry warehouse photo. That gap between reality and presentation costs manufacturers real deals. This post is about closing that gap using 3D industrial rendering for commercial tenders, brochures and sales decks: a practical guide for manufacturers who are tired of showing up to high-value pitches with substandard visuals.
We work with manufacturers across sectors — industrial automation, electrical switchgear, material handling, clean energy infrastructure, heavy fabrication — and the pattern is consistent. Engineering is world-class. Presentation is an afterthought. A competitor with an inferior product but a polished deck wins the tender. That’s not speculation; it’s what clients tell us after the fact when they come looking for better visuals the second time around.
This guide covers exactly what 3D rendering delivers for manufacturers, how the process works in a real production environment, what to get right from the start, and where most teams go wrong when they try to do this in-house or on a tight brief.
Why Photographs Almost Never Work for Industrial Sales Materials
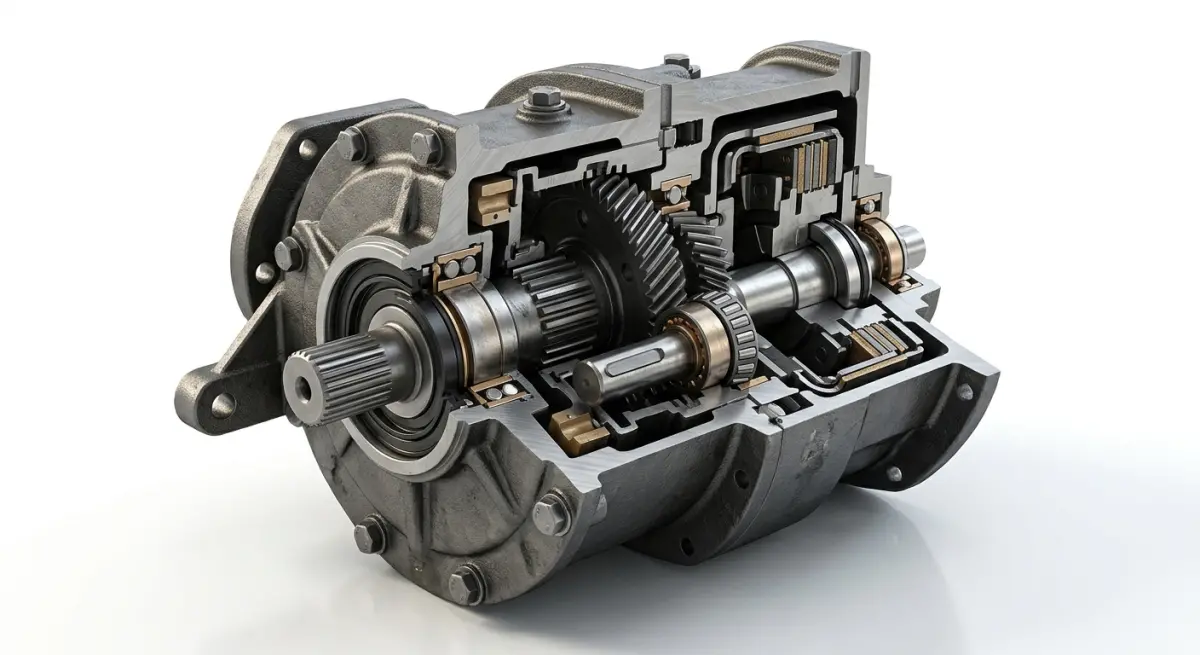
The instinct is to photograph your product. It exists. It’s physical. Just hire a photographer, right? The problem is multi-layered. First, prototypes and early production units are rarely in a condition you’d want to show a procurement committee — there are assembly marks, temporary fittings, unfinished surface treatments. Second, industrial products are often large, installed in awkward environments, surrounded by pipes, cables, and scaffolding that obscure the actual product. Third, the angles that communicate engineering value — isometric cutaways, internal assemblies, exploded component views — are physically impossible to photograph.
A rendered image exists outside those constraints entirely. We can show a gas turbine enclosure in a pristine environment with dramatic side-lighting that makes the housing geometry read clearly. We can slice the unit open and show the internal cooling channels in one frame and the exterior installation context in another. That combination of views — exterior, interior, environmental — is what procurement reviewers and technical evaluators actually want to see. Photographs can’t give you that. CAD exports presented raw look like homework. Rendering bridges the gap.
3D Industrial Rendering for Commercial Tenders, Brochures and Sales Decks: What the Output Actually Looks Like
The term “rendering” covers a wide range of outputs, and for manufacturers it’s worth being specific about what you’re actually getting.
Still Renders for Print and Digital
These are high-resolution images — typically exported at 300 DPI for print and up to 4K for large-format display or digital decks. For tenders and brochures, you want a minimum set: a hero exterior view, a secondary three-quarter view, an environment shot showing the product in context (on a factory floor, within an electrical substation, installed in a building section), and one close-up detail shot highlighting key engineering features. That’s a baseline. Depending on complexity, you may need more.
Exploded Views and Technical Diagrams
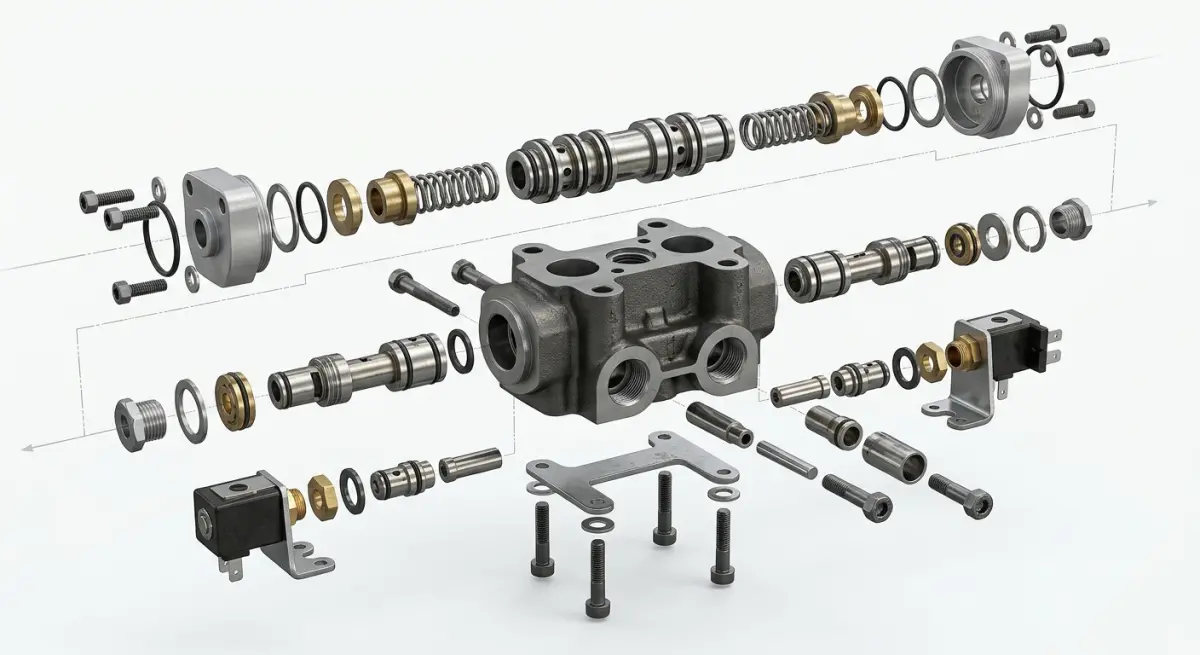
This is where 3D rendering genuinely outperforms anything else available to manufacturers. An exploded view renders each component in its correct spatial relationship to the others, separated along an axis so the viewer can see how everything assembles. Combined with callout annotations, this becomes the clearest possible way to explain product architecture in a brochure or tender document without requiring the reader to interpret engineering drawings.
Animated Walkthroughs and Turntables
For sales decks and digital presentations, short animations are increasingly standard. A 20-second turntable showing your machine from every angle, or a 60-second animation showing the product powering up with internal mechanisms moving, does more work in a boardroom presentation than ten static slides. The barrier here is time — animation takes longer to produce and review — so manufacturers need to plan for it, not request it the week before a pitch.
Interactive 3D and Configurators
At the more technical end, some manufacturers need interactive product viewers that allow a prospect to rotate, zoom, and explore the product in real time in a browser. This is more of a web development and 3D integration project, but it starts from the same asset base as rendered images. If you’re planning digital-first sales materials, it’s worth asking your rendering partner whether the models will be built in a way that supports interactive export later.
What You Need to Provide — and What You Don’t
This is the question we get most often: “We don’t have finished 3D models — can you still render our product?” The answer is usually yes, with nuance.
| What You Have | What’s Possible | What the Studio Needs to Do |
|---|---|---|
| Full CAD files (SolidWorks, CATIA, Creo, Inventor) | Full fidelity rendering with exact geometry | Clean, optimise, texture, light, render |
| Partial CAD + reference photographs | High-fidelity rendering with minor modelling additions | Gap-fill modelling, then full pipeline |
| Technical drawings (2D) + specifications | Accurate interpretation rendering | Model from scratch, then full pipeline |
| Concept sketches or design intent only | Conceptual renders for pre-production marketing | Modelling, design interpretation, full pipeline |
The quality ceiling is higher when you provide CAD — there’s simply more geometric accuracy to work with. But manufacturers who come to us with only 2D drawings and photographs of similar competitor products have ended up with renders good enough to win tenders, because the brief was well-defined and the modelling was done carefully. What matters most is the quality of the brief, not the quality of the source files.
What your team needs to communicate clearly: material finishes (RAL codes, surface textures, any branded colour specifications), the environment where the product is typically installed, the audience for the output (procurement committee versus technical evaluator versus end-user), and the intended use (A4 print, large-format exhibition, 16:9 digital deck, web).
Common Mistakes Manufacturers Make with Industrial Renders
We’ve seen the same errors repeat across industries, and they’re worth naming directly.
Treating renders as a last-minute add-on. Manufacturers finalise their tender document and then, three days before submission, ask for “a few nice images.” That timeline produces mediocre results. Renders made well — with proper lighting studies, material passes, and environment staging — take time. For a complex machine, allow two to three weeks minimum for still renders, longer for animation. Build this into your project timeline the same way you’d build in print lead times.
Using render outputs designed for print in digital decks. A 300 DPI image exported for an A4 brochure looks different when dropped into a 1920×1080 PowerPoint slide. Formats need to be specified upfront, or you’ll end up with images that look slightly blurry on screen even though they’re technically high resolution.
Not specifying the environment. We get briefs that say “show the machine in a factory.” That’s almost no information. What kind of factory? What’s the floor surface? Is it a controlled clean environment or a heavy industrial floor? What’s the ambient light source — skylights, high-bay fluorescents, dramatic directional? The environment is half the render. When clients don’t specify, we make reasonable choices, but they may not match the context your customers actually recognise.
Skipping the review round. A single review pass after the first draft is not enough for industrial renders. Materials look different in rendered light than they do in a material swatch. Proportions that looked right in CAD sometimes read differently in a perspectival render. Two structured review rounds — one after rough composition is approved, one after materials and lighting are locked — catch most issues before final export.
Ignoring brand consistency. Your product renders and your brand guidelines need to talk to each other. If your brochure is dark and technical, the renders should match that palette. If your brand uses light, clean environments, a dark industrial render will look like it came from a different company. This sounds obvious, but render briefs rarely include brand guidelines, and the visual misalignment shows.
Renders for Tenders Specifically: What Procurement Committees Actually Look For
Tender documents have a different requirement set than brochures or sales decks. Procurement reviewers are often evaluating multiple submissions simultaneously. They want to see technical credibility — that you understand your own product — alongside commercial confidence. A render that shows a clean, well-staged machine with visible quality in materials and finish signals that the manufacturer takes the product seriously. It’s a proxy for professionalism.
For government and institutional tenders specifically, environment context matters. Showing your transformer or HVAC system installed in a plausible site environment — with correct spatial scale relative to surrounding infrastructure — helps reviewers understand scope and installation requirements without reading pages of technical specification. That’s a real advantage in competitive tender situations where reviewers may spend less than ten minutes on each submission’s visual pages.
Include a combination of views: the full product in environment context, a clean studio-style exterior render showing the product in isolation, and at least one detail or cutaway view showing internal quality. That three-view approach communicates product confidence without overloading the document.
What a Realistic Project Looks Like at Our Studio
A manufacturer comes to us with SolidWorks files for an industrial chiller unit. They need materials for an upcoming tender and a product launch brochure. Here’s how a real project flows:
Week one: We receive the CAD files, brief document, and brand guidelines. Our team cleans the model, resolves geometry issues that CAD software generates which don’t matter for engineering but cause problems in rendering, and begins blocking out camera positions. We share rough grey-model renders — no materials, no final lighting — to confirm composition and scale before investing in material and lighting work.
Week two: Materials and environment. We apply the specified RAL colours, surface finishes (brushed stainless, powder-coated panels, rubber seals, glass gauges), and stage the product in the agreed environment. A round of review images goes to the client for feedback on materials and atmosphere.
Week three: Final render pass at full resolution. Corrections from review round two are applied. Files are delivered in agreed formats — high-res TIFF for print, 4K JPEG for digital, PNG with transparency where needed for design layout.
That’s a compressed but realistic timeline for a medium-complexity industrial product. Larger systems — power generation equipment, full plant installations, modular building systems — take longer and involve more structured review stages.
Making the Investment Work Across Multiple Materials
One of the best things about a well-built 3D model is that it’s an asset, not a one-use file. The same model that generates your tender renders can produce your brochure images, your exhibition display graphics, your website visuals, and your sales deck content. That amortises the modelling cost across multiple deliverables. Manufacturers who plan this upfront — building a single high-quality asset and then scheduling multiple render outputs — get far better ROI than those who treat each project as a separate commission.
Our 3D product rendering services are designed for exactly this kind of asset-first approach. We build the model properly once, with the level of detail and geometry quality that supports multiple output types, and then render from that single source across your full suite of materials.
If you’re preparing for a major tender, a product launch, or an exhibition and want to understand what’s genuinely achievable with your existing CAD files or drawings, the first step is a proper brief conversation. Reach out to our team and we’ll give you a straight assessment of timeline, scope, and what you’ll need to provide to get results that actually win work.
Frequently Asked Questions
How much does 3D industrial rendering cost for commercial tenders and sales decks?
3D industrial rendering costs vary widely depending on complexity, ranging from $500–$2,000 for simpler product renders to $5,000–$20,000+ for detailed facility or machinery visualizations used in high-stakes tenders. Factors like the number of views, level of detail, animation requirements, and turnaround time all influence pricing. Many manufacturers find the ROI justified when a single winning tender can represent hundreds of thousands in contract value.
What file formats and specifications should manufacturers provide to a 3D rendering studio for industrial projects?
Most 3D rendering studios work best with CAD files in formats such as STEP, IGES, SolidWorks (.SLDPRT), AutoCAD (.DWG), or OBJ, as these preserve accurate geometry critical for industrial accuracy. You should also supply material spec sheets, brand color references (Pantone or RAL codes), reference photography, and any dimensional drawings to ensure the final render matches your actual product. The more complete your technical documentation, the faster the studio can produce accurate, approval-ready visuals.
How long does it take to produce 3D industrial renders for a commercial tender submission?
A standard set of 3–5 high-quality static industrial renders typically takes 5–15 business days from receiving complete asset files, though complex machinery or facility environments can extend timelines to 3–6 weeks. Rush delivery options are often available at an additional cost, making early planning essential when working toward tender deadlines. Building rendering lead time into your project schedule from the outset prevents last-minute quality compromises.
Can 3D rendering replace traditional product photography for manufacturer sales brochures and presentations?
Yes, 3D industrial rendering can fully replace traditional product photography for sales brochures and decks, and in many cases delivers superior results because it allows perfect lighting, impossible camera angles, and cutaway or exploded views that photography cannot achieve. It is especially valuable for products that are too large, dangerous, or not yet manufactured to photograph practically. Renders are also infinitely reusable and easily updated when product specifications change, making them more cost-effective over a product's lifecycle.
What makes a 3D industrial render persuasive enough to win commercial tenders compared to standard drawings or photos?
Photorealistic 3D renders communicate technical credibility and professional polish simultaneously, helping procurement decision-makers visualize the finished solution in context rather than interpreting abstract drawings. Renders can show your product installed in a realistic environment, highlight key differentiating features through cutaway or annotation overlays, and maintain consistent brand presentation across every tender document. Studies in B2B sales consistently show that high-quality visuals increase stakeholder confidence and can meaningfully improve win rates on competitive bids.